Program and Debug the ESP32-C3

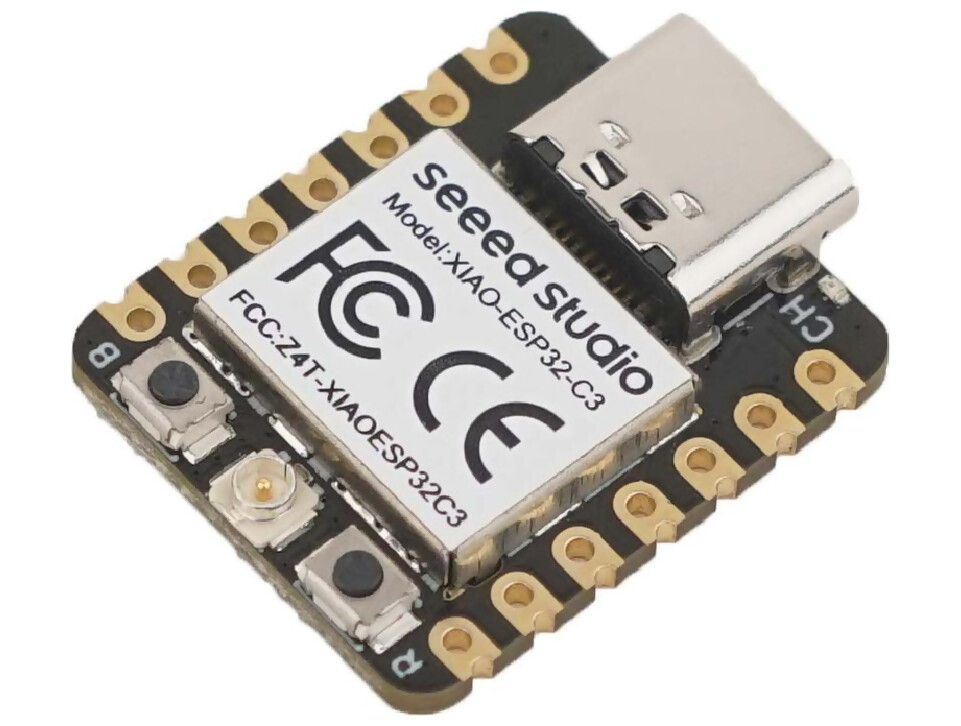
Setup programming and inbuilt JTAG debugging for an ESP32-C3 on Platformio.

  • This is a ‘your results may vary’ solution, due to unknown variation.

Connection

Check first that your ESP32-C3 is recognised when connected via USB (Linux).

user@machine:~$ lsusb
...
Bus 008 Device 033: ID 303a:1001 Espressif USB JTAG/serial debug unit
...

platformio.ini

Some build flags are required if you wish to enable serial output over USB, at the bitrate set by monitor_speed.

The on-chip CMSIS-DAP device handles uploading for debugging, JTAG debugging, and can also flash code for non-debugger uploads if required.

For non-debugger builds, we can choose to use the USB CDC Serial firmware upload tool, which affords us some extra project statistics.

; PlatformIO Project Configuration File
;
;   Build options: build flags, source filter
;   Upload options: custom upload port, speed and extra flags
;   Library options: dependencies, extra library storages
;   Advanced options: extra scripting
;
; Please visit documentation for the other options and examples
; https://docs.platformio.org/page/projectconf.html

[env:esp32-c3-devkitm-1]
platform = espressif32
board = esp32-c3-devkitm-1
framework = arduino

monitor_speed=115200

build_flags = 
  -D ARDUINO_USB_MODE=1          ; Enable USB hardware (if used).
  -D ARDUINO_USB_CDC_ON_BOOT=1   ; Enable CDC (Communications Device
                                 ; Class) functionality on boot, 
                                 ; enabling USB serial communication.

debug_tool = cmsis-dap           ; on-chip JTAG debug
; upload_protocol = esp-builtin    ; on-chip JTAG upload (less feedback)
upload_protocol = esptool        ; USB serial upload
debug_init_break = tbreak setup
debug_server =
  $PLATFORMIO_CORE_DIR/packages/tool-openocd-esp32/bin/openocd
  -f $PLATFORMIO_CORE_DIR/packages/tool-openocd-esp32/share/openocd/scripts/board/esp32c3-builtin.cfg
  

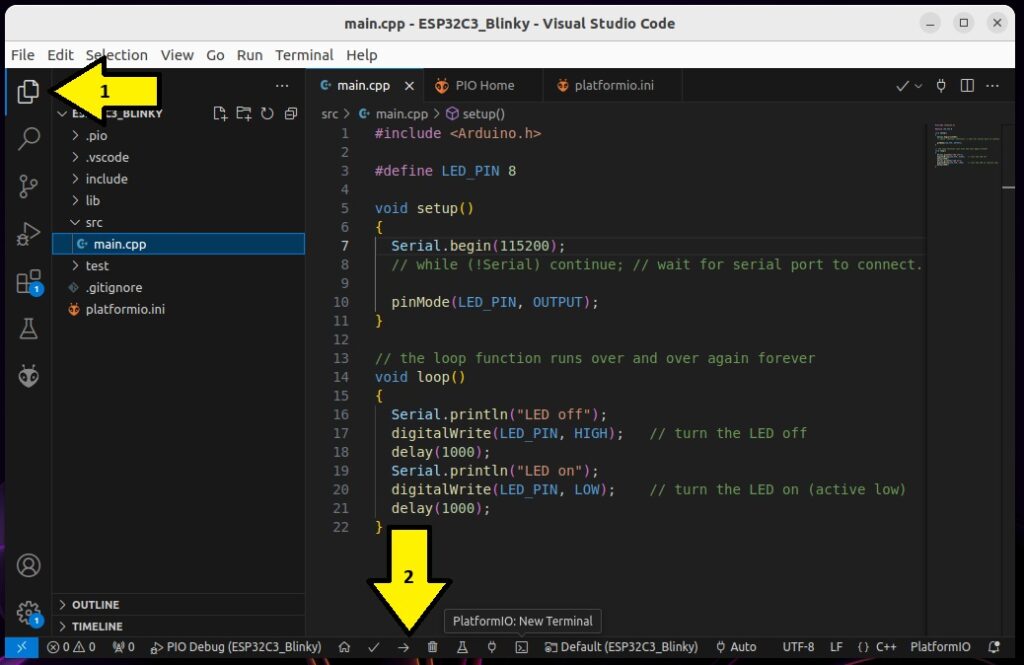
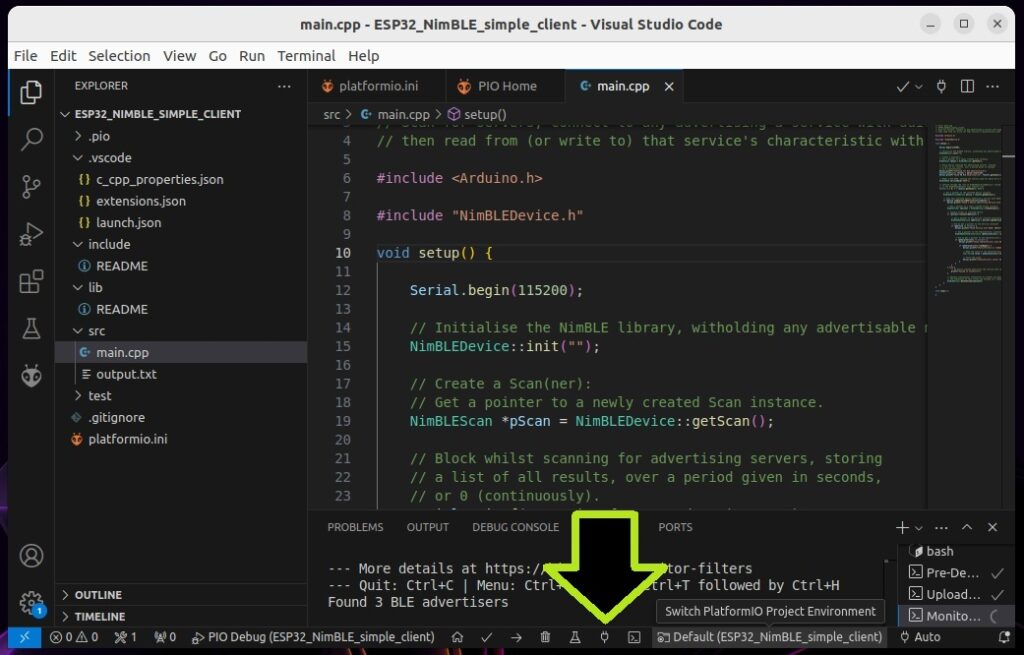
build and upload via USB serial

Remember that you can always enter program upload mode manually by RESETting the device with the BOOT switch depressed, in cases where previously programmed serial configuration prevents automatic CDC uploads.

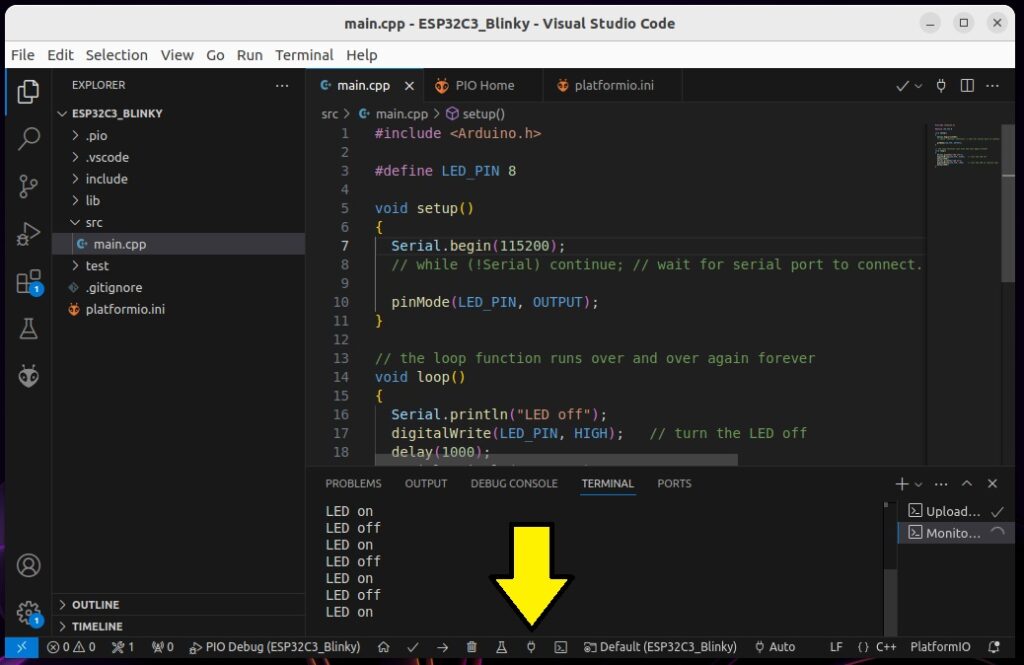
monitor serial

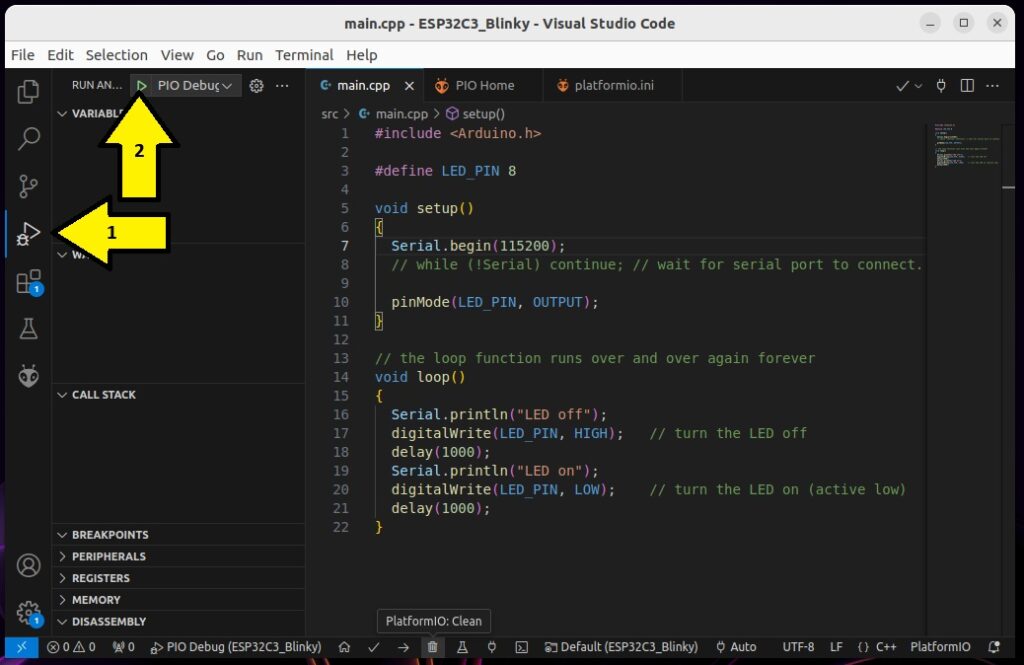
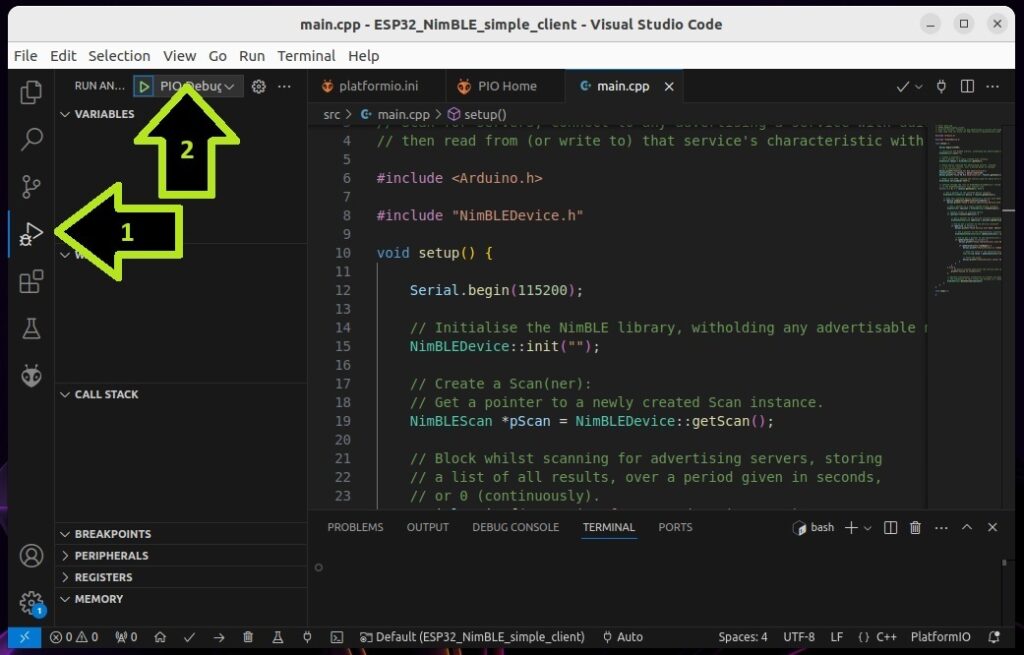
build for debugging then flash by JTAG

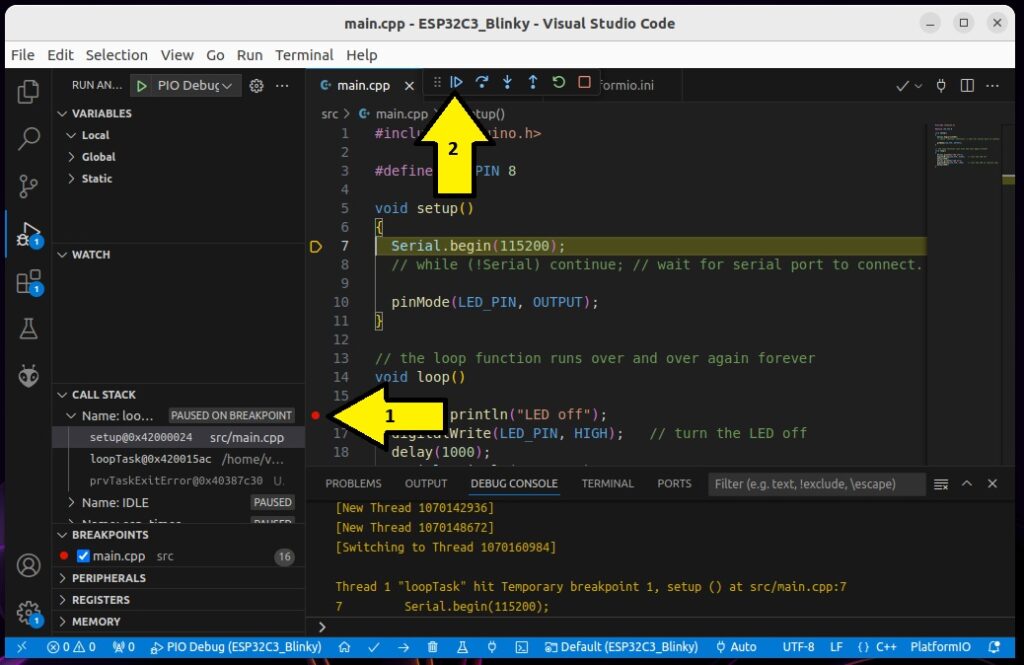
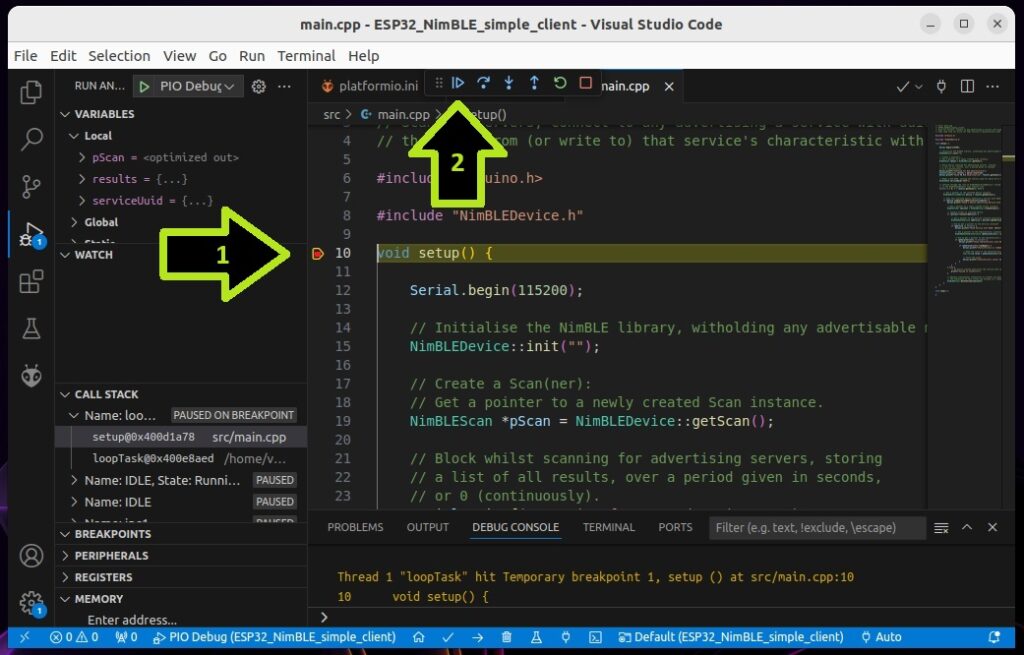
Full rebuild and upload produces lengthy wait, then blue ‘working’ indicator stops and the debugger control pallet appears.

set breakpoint and debug via JTAG


If you’ve found this compilation useful, then your assistance in helping others find it will be both benevolent and appreciated.


Bluetooth BLE scanner iBeacon decoder

A Bluetooth BLE iBeacon observer, that scans for a list of available beacons, then for each iBeacon found, it reads and processes it’s gathered data.

The example presented builds using Platformio with the espressif arduino-esp32 core, and leverages the NimBLE-Arduino Bluetooth library.

Project source code

; PlatformIO Project Configuration File
;
;   Build options: build flags, source filter
;   Upload options: custom upload port, speed and extra flags
;   Library options: dependencies, extra library storages
;   Advanced options: extra scripting
;
; Please visit documentation for the other options and examples
; https://docs.platformio.org/page/projectconf.html

[env:esp32dev]
platform = espressif32
board = esp32dev
framework = arduino


monitor_speed = 115200


lib_deps = h2zero/NimBLE-Arduino@^1.4.0
// File: main.cpp 
// ESP32_NimBLE_scanner_iBeacon_decoder.
// <green@bug-eyed.monster> MIT License.
//
// An iBeacon observer.
// Scan for servers and log each unique result. 
// Read each logged BLE beacon in turn, filter for
// iBeacons, then process their manufacturer_data.
// Repeat.

#include <Arduino.h>

#include "NimBLEBeacon.h"
#include "NimBLEDevice.h"


#define ENDIAN_CHANGE_U16(x) ((((x)&0xff00) >> 8) + (((x)&0xff) << 8))


void setup() { 

    Serial.begin(115200);

    // Initialise the NimBLE library, witholding any advertisable name.
    NimBLEDevice::init("");
    
    // Create a Scan(ner):
    // Get a pointer to a newly created Scan instance.
    NimBLEScan *pScan = NimBLEDevice::getScan();

    // Set active scanning, this will get more data from the advertiser.
    // Comment-out if not interested in iBeacon name.
    pScan->setActiveScan(true);

    // Block whilst scanning for advertising servers, storing
    // a list of all results, over a period given in seconds.
    Serial.printf("Scanning for BLE advertisers\n");
    NimBLEScanResults results = pScan->start(10);
    Serial.printf("Found %d BLE advertisers\n", results.getCount());
    
    // Iterate through the list of NimBLEAdvertisedDevice's stored
    // in the NimBLEScanResults scan results list.
    for(int i = 0; i < results.getCount(); i++) {

        // Get a pointer to the iterated Device instance.
        NimBLEAdvertisedDevice advertisedDevice = results.getDevice(i);

        // Retrieve the BLE beacon's manufacturer_data.
        std::string strManufacturerData = advertisedDevice.getManufacturerData();

        // Did we find any manufacturer_data?
        if (strManufacturerData != "")
        {
            // Look for Apple ID and iBeacon length
            if (strManufacturerData.length() == 25 &&
                strManufacturerData[0] == 0x4c &&
                strManufacturerData[1] == 0x00 &&
                strManufacturerData[2] == 0x02 &&
                strManufacturerData[3] == 0x15) 
            {
                // Leverage the NimBLEBeacon library 
                // to help process the iBeacon data.
                NimBLEBeacon iBeacon = NimBLEBeacon();

                // Load our NimBLEBeacon object with manufacturer_data.
                iBeacon.setData(strManufacturerData);

                // Process this found iBeacon's data
                Serial.printf("Name     : %s\n",
                        advertisedDevice.getName().c_str());
                Serial.printf("Address  : %s\n",
                        advertisedDevice.getAddress().toString().c_str());
                Serial.printf("UUID     : %s\n",
                        iBeacon.getProximityUUID().toString().c_str());
                Serial.printf("Major    : %d\n",
                        ENDIAN_CHANGE_U16(iBeacon.getMajor()));
                Serial.printf("Minor    : %d\n",
                        ENDIAN_CHANGE_U16(iBeacon.getMinor()));
                Serial.printf("TX power : %d dBm\n",
                        iBeacon.getSignalPower());
                Serial.printf("RSSI     : %d dBm\n",
                        advertisedDevice.getRSSI());
                Serial.println("-----------------------------------------------");
            }
        }
    }
}

void loop() {

    setup();
}

Serial Port Output

Output obtained when run in proximity to one BLE iBeacon device flashed with the companion Bluetooth BLE iBeacon on ESP32.

Scanning for BLE advertisers
Found 2 BLE advertisers
Name     : ESP32-iBeacon
Address  : 08:b6:1f:37:f3:92
UUID     : c6dd05d0-b428-4bd5-8831-4b62651e2b41
Major    : 1
Minor    : 1
TX power : -60 dBm
RSSI     : -64 dBm
-----------------------------------------------
Scanning for BLE advertisers

Suggested reading: https://www.elektor.com/products/develop-your-own-bluetooth-low-energy-applications (no affiliation).


Bluetooth BLE iBeacon on ESP32

An exploration of BLE_iBeacon.ino – A Bluetooth BLE iBeacon on an ESP32.

The example presented builds using Platformio with the espressif arduino-esp32 core, and leverages the NimBLE-Arduino Bluetooth library.

Project source code

; File: platformio.ini
; PlatformIO Project Configuration File
;
;   Build options: build flags, source filter
;   Upload options: custom upload port, speed and extra flags
;   Library options: dependencies, extra library storages
;   Advanced options: extra scripting
;
; Please visit documentation for the other options and examples
; https://docs.platformio.org/page/projectconf.html

[env:esp32dev]
platform = espressif32
board = esp32dev
framework = arduino

monitor_speed=115200

lib_deps = h2zero/NimBLE-Arduino@^1.4.0
// File: main.cpp
/*
   Based on Neil Kolban example for IDF: https://github.com/nkolban/esp32-snippets/blob/master/cpp_utils/tests/BLE%20Tests/SampleScan.cpp
   Ported to Arduino ESP32 by pcbreflux
   Changed and augmented by <green@bug-eyed.monster> - MIT License.
*/
// Create a BLE server that will send periodic iBeacon frames.
//   1. Create a BLE Server
//   2. Create advertising data
//   3. Start advertising.   


#include <Arduino.h>
#include "NimBLEDevice.h"
#include "NimBLEBeacon.h"


// Freshly generated beacon UUID:
// https://www.uuidgenerator.net/
// or linux tool uuidgen
// msb nsb Address type:
//  0   0  private random non-resolvable
//  0   1  private random resolvable
//  1   1  random static address
// Make 2 most significant bits 1 to indicate a random static address for iBeacon.
#define BEACON_UUID "C6dd05d0-b428-4bd5-8831-4b62651e2b41" // Beacon UUID 128-Bit 

// Comment-out to disable iBeacon naming.
#define NAMED_iBEACON

// Select iBeacon name to advertise.
#define iBEACON_NAME "ESP32-iBeacon"

// Choose a transmit power.
// -12dBmW - 0.0625mW
// -9dBmW  - 0.125mW
// -6dBmW  - 0.250mW
// -3dBmW  - 0.500mW
//  0dBmW  - 1.000mW
//  3dBmW  - 2.000mW
//  6dBmW  - 4.000mW
//  9dBmW  - 8.000mW
#define iBEACON_POWER  ESP_PWR_LVL_N0  // 1.000mW

// Average received transmission power in dBmW @ 1 meter. 
// Measure and record RSSI at 1 meter over 10-sec then record the average.
#define MEASURED_POWER -60 


// Global Advertising(er) object used to control the Advertisement.
BLEAdvertising *pAdvertising;


void setup() {

  Serial.begin(115200);

  Serial.printf("start %s\n", iBEACON_NAME);
  
  // Initialise the NimBLE library, witholding any advertisable name for now.
  BLEDevice::init("");

  // Set transmitter power.
  BLEDevice::setPower(iBEACON_POWER); 

  // Get a pointer to an Advertising(er) instance, for subsequent population.
  pAdvertising = BLEDevice::getAdvertising();
  
  // Create and initialise AdvertisementData object.
  BLEAdvertisementData oAdvertisementData = BLEAdvertisementData();
#ifdef NAMED_iBEACON
  // Create and initialise ScanResponseData object.
  BLEAdvertisementData oScanResponseData = BLEAdvertisementData();

  // Populate ScanResponse with iBeacon's name.
  oScanResponseData.setName(iBEACON_NAME);
#endif

  // Set Advertisement flags to indicate capabilities and features of
  // this Bluetooth device. iBeacon is a generally discoverable BLE device.
  //   LE Limited Discoverable Mode         0x01
  //   LE General Discoverable Mode         0x02
  //   BR/ERD Not Supported                 0x04   (device only supports BLE)
  //   LE and BR/EDR Capable (Controller)   0x08
  //   LE and BR/EDR Capable (Host)         0x0F
  oAdvertisementData.setFlags(0x06); // LE General Discoverable Mode 0x02 | BR/ERD Not Supported 0x04

  // Assemble the manufacturer_data.
  BLEBeacon oBeacon = BLEBeacon();
  oBeacon.setManufacturerId(0x4C00); // Use Apple 0x004C ID without license, as no iPhone App
  oBeacon.setProximityUUID(BLEUUID(BEACON_UUID));
  oBeacon.setMajor(1);
  oBeacon.setMinor(1);
  oBeacon.setSignalPower((char)MEASURED_POWER); // Add the measured power value
  
  // Add manufacturer_data to AdvertisementData.
  std::string strServiceData = "";
  strServiceData += (char)(26);     // Length of the manufacturer_data
  strServiceData += (char)0xFF;     // Indicates that type is manufacturer_data
  strServiceData += oBeacon.getData(); 
  oAdvertisementData.addData(strServiceData);

  // Add AdvertisementData to Advertising(er).
  pAdvertising->setAdvertisementData(oAdvertisementData);
#ifdef NAMED_iBEACON
  // Add ScanResponseData to Advertising(er).
  pAdvertising->setScanResponseData(oScanResponseData);
#endif

  // Choose an Advertising mode for the Advertising(er).
  // iBeacon is a non-connectable, undirected broadcaster,
  // set the appropriate PDU type in the packet header.
  //   BLE_GAP_CONN_MODE_NON (non-connectable; 3.C.9.3.2).
  //   BLE_GAP_CONN_MODE_DIR (directed-connectable; 3.C.9.3.3).
  //   BLE_GAP_CONN_MODE_UND (undirected-connectable; 3.C.9.3.4).
  pAdvertising->setAdvertisementType(BLE_GAP_CONN_MODE_NON);

   // Start advertising
  pAdvertising->start();
  Serial.println("Advertising started...");
}

void loop() {

}

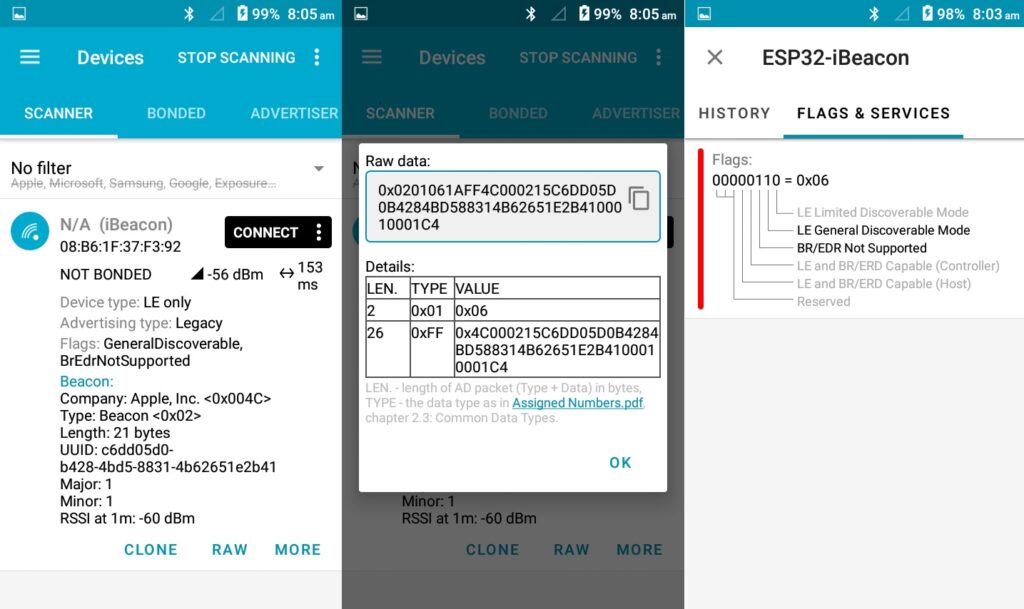
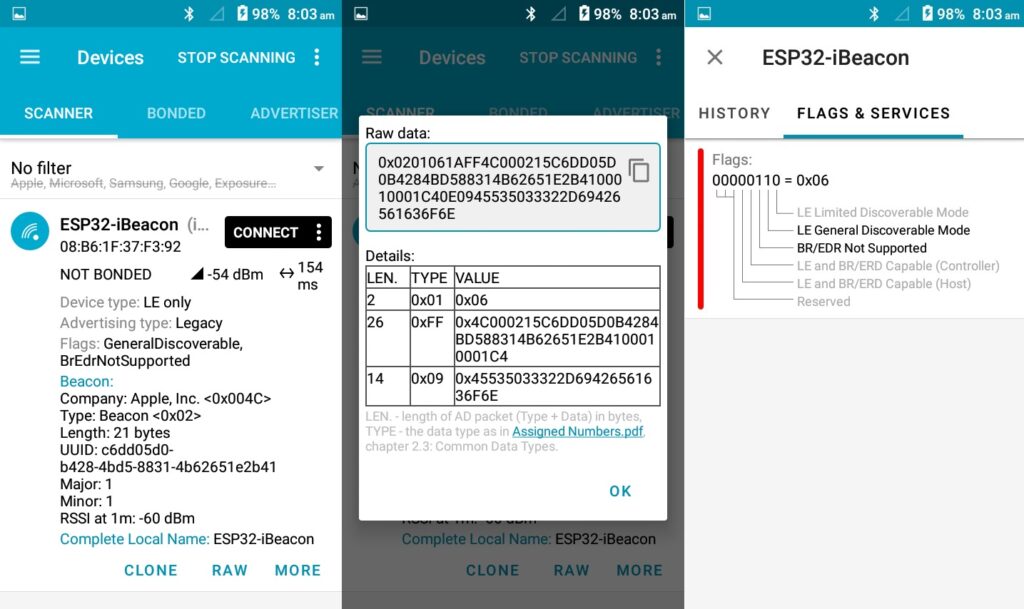
Nordic nRF Connect mobile app screenshots

passive scan of nameless build

active scan of build with name

Prototypical reference: https://github.com/h2zero/NimBLE-Arduino/blob/master/examples/Refactored_original_examples/BLE_iBeacon/BLE_iBeacon.ino

Suggested reading: https://www.elektor.com/products/develop-your-own-bluetooth-low-energy-applications (no affiliation).


Setup esp-prog for ESP-WROOM-32

Wire an Espressif esp-prog debugger to a ESP-WROOM-32 DEV KIT MODULE, and setup debugging on Platformio.

Prerequisites:

  • esp-prog debugger.
  • ESP-WROOM-32 DEV KIT MODULE (or ESP-WROOM-32 chip).
  • 6-12 Dupont leads, male to female.

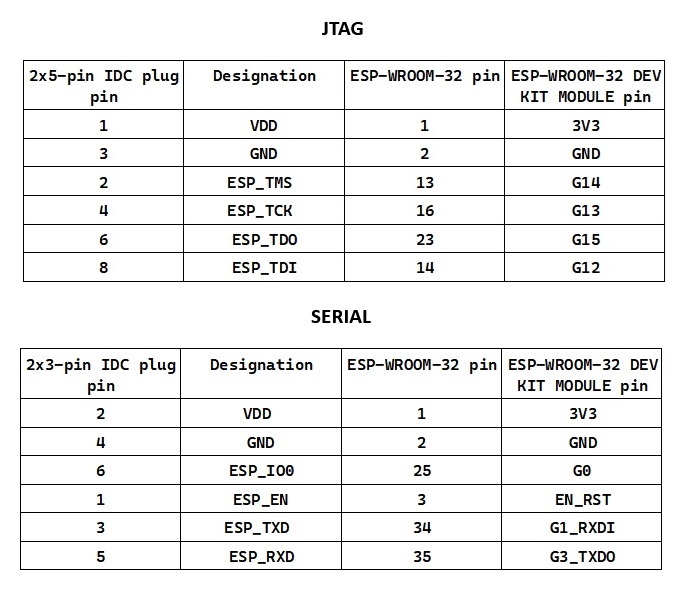
esp-prog IDC to ESP-WROOM-32 and DEV KIT MODULE wiring

A typical setup involves using the esp-prog JTAG interface for uploading and debugging.

To monitor program output during runtime, you can either use the built-in FTDI serial of the esp-prog, or save on extra wiring by utilising the onboard FTDI serial of the ESP-WROOM-32 Dev Kit Module. Source selection is automated.

If you choose the latter option, you can safely connect the VDD 3V3 line of the esp-prog to the USB-powered Dev Kit Module, as the esp-prog includes reverse current protection circuitry.

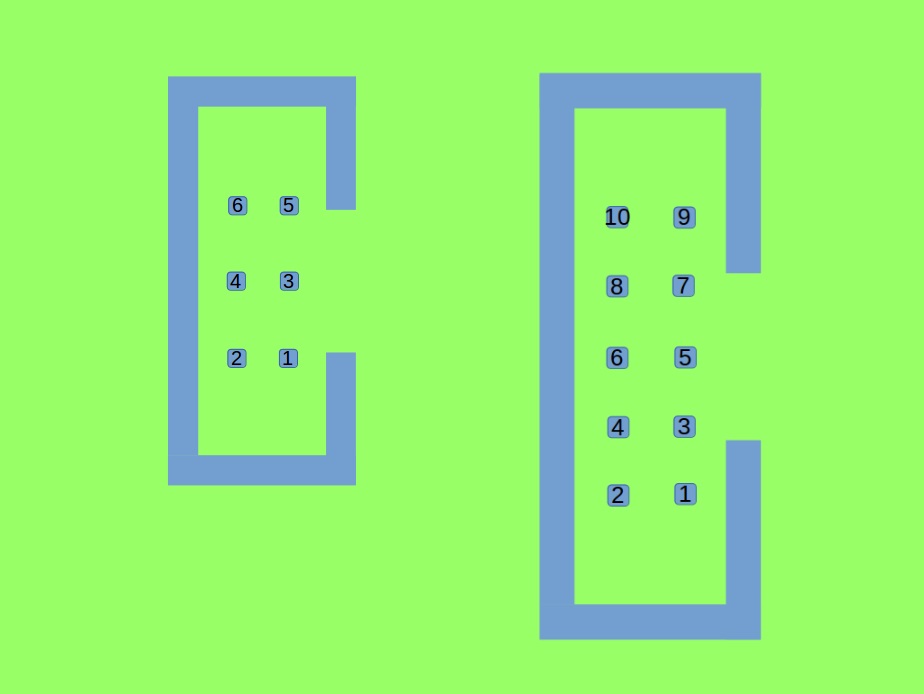
esp-prog IDC pinouts

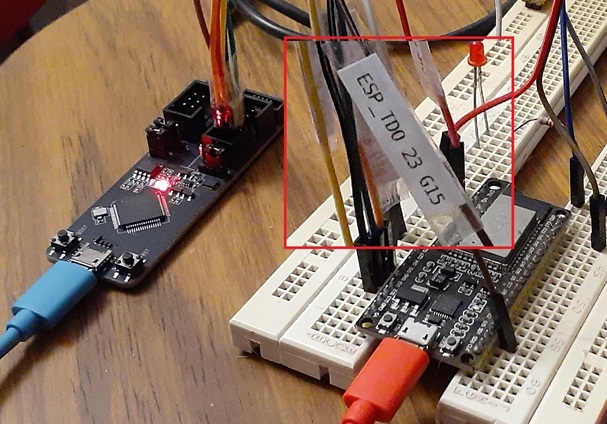
Add wiring tags to DuPont leads

Print this file esp-prog_wiring_flags.txt, cut out wiring tags, and Sellotape them to your DuPont leads.

platformio.ini file

; PlatformIO Project Configuration File
;
;   Build options: build flags, source filter
;   Upload options: custom upload port, speed and extra flags
;   Library options: dependencies, extra library storages
;   Advanced options: extra scripting
;
; Please visit documentation for the other options and examples
; https://docs.platformio.org/page/projectconf.html

[env:esp32dev]
platform = espressif32
board = esp32dev
framework = arduino

; monitor either autoset serial 
monitor_speed = 115200
#monitor_port = /dev/ttyUSB2 ; uncomment & tune if autoset fails
monitor_filters = esp32_exception_decoder

; upload and debug via esp-prog JTAG
upload_protocol = esp-prog
debug_tool = esp-prog
debug_init_break = tbreak setup

lib_deps = 

build and upload via JTAG

monitor either serial

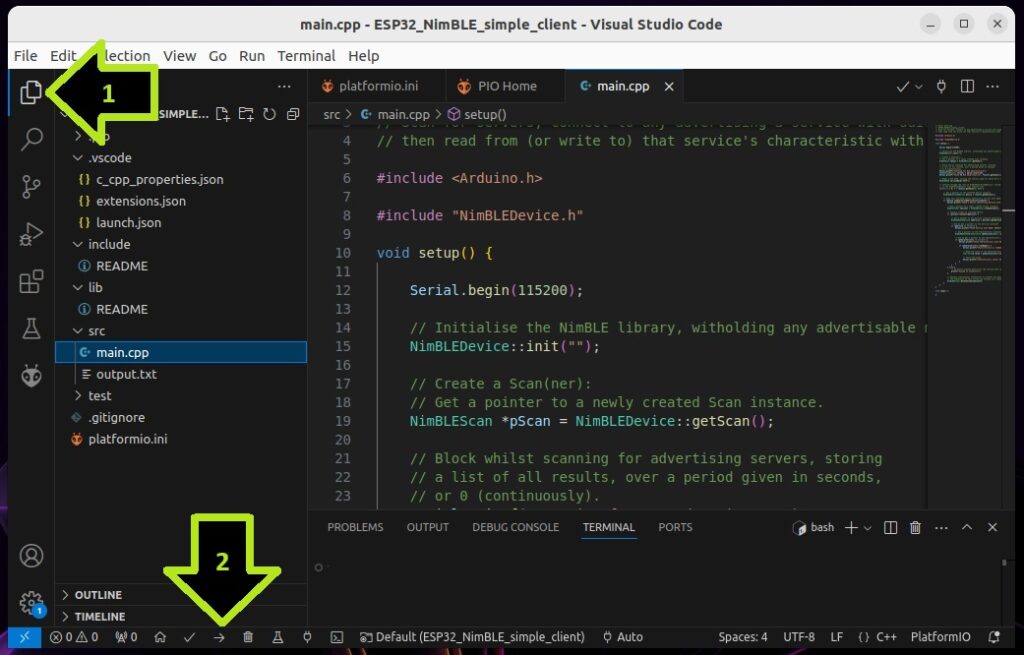
build for debug and JTAG upload

Full rebuild and upload produces lengthy wait, then blue ‘working’ indicator stops and the debugger control pallet appears.

set breakpoint and debug via JTAG

If you’ve found this compilation useful, then your assistance in helping others find it will be both benevolent and appreciated.


Simple BLE Scanner Client on ESP32

Exploration of Creating a Client: a simple Bluetooth BLE scanner that compiles a list of proximate servers, then attempts connection to each in turn. Those devices with a specific connectable service, having a specific read/write characteristic, are read from.

The example presented builds using Platformio with the espressif arduino-esp32 core, and leverages the NimBLE-Arduino Bluetooth library.

Project source code

; File: platformio.ini
; PlatformIO Project Configuration File
;
;   Build options: build flags, source filter
;   Upload options: custom upload port, speed and extra flags
;   Library options: dependencies, extra library storages
;   Advanced options: extra scripting
;
; Please visit documentation for the other options and examples
; https://docs.platformio.org/page/projectconf.html

[env:esp32dev]
platform = espressif32
board = esp32dev
framework = arduino

monitor_speed=115200

lib_deps = h2zero/NimBLE-Arduino@^1.4.0
// File: main.cpp 
// ESP32_NimBLE_simple_client.
// Scan for servers, connect to any advertising a service with uuid "ABCD",
// then read from (or write to) that service's characteristic with uuid "1234".

#include <Arduino.h>

#include "NimBLEDevice.h"

void setup() { 

    Serial.begin(115200);

    // Initialise the NimBLE library, witholding any advertisable name.
    NimBLEDevice::init("");
    
    // Create a Scan(ner):
    // Get a pointer to a newly created Scan instance.
    NimBLEScan *pScan = NimBLEDevice::getScan();

    // Block whilst scanning for advertising servers, storing
    // a list of all results, over a period given in seconds,
    // or 0 (continuously).
    Serial.printf("Scanning for BLE advertisers\n");
    NimBLEScanResults results = pScan->start(10);
    Serial.printf("Found %d BLE advertisers\n", results.getCount());
    
    // Model a BLE UUID, setting the service uuid for which we'll look.
    NimBLEUUID serviceUuid("ABCD");
    
    // Iterate through the list of NimBLEAdvertisedDevice's stored
    // in the NimBLEScanResults scan results list.
    for(int i = 0; i < results.getCount(); i++) {

        // Get a pointer to the iterated Device instance.
        NimBLEAdvertisedDevice device = results.getDevice(i);
        
        // Does this iterated device advertise a service with UUID: "ABCD"?
        if (device.isAdvertisingService(serviceUuid)) {
            Serial.printf("Found a device advertising Service with UUID: ABCD\n");

            // Get a pointer to a newly created Client instance.
            NimBLEClient *pClient = NimBLEDevice::createClient();
            
            // Connect Client to iterated device.   
            if (pClient->connect(&device)) {

                // Get a pointer to the Service instance previously found.
                NimBLERemoteService *pService = pClient->getService(serviceUuid);
                
                // Did we get a pointer to the Service instance?
                if (pService != nullptr) {
                    Serial.printf("Found Service with UUID: ABCD\n");
                    
                    // Get a pointer to the Characteristic instance with UUID: "1234".
                    NimBLERemoteCharacteristic *pCharacteristic = pService->getCharacteristic("1234");
                    
                    // Did we get a pointer to the Characteristic instance we want?
                    if (pCharacteristic != nullptr) {
                        Serial.printf("Found Characteristic with UUID: 1234\n");

                        if (pCharacteristic->canRead()) {
                            Serial.printf("Characteristic is readable\n");

                            // Read the value of the Characteristic.
                            std::string value = pCharacteristic->readValue();

                            // Print the value.
                            Serial.printf("Characteristic value: %s\n", String(value.c_str()));
                        }
                    }
                }
            } else {
                // No device scanned advertises the service with characteristic we sought.
                printf("Failed to connect\n");
            }
            
            // Because simultaneous connections to Clients are possible, we abandon
            // the connection to this iterated client and reclaim it's resources.
            NimBLEDevice::deleteClient(pClient);
        }
    }
}

void loop() {

}

Serial Port Output

Output obtained when run in proximity to one BLE device flashed with the companion Simple BLE Server on ESP32.

Scanning for BLE advertisers
Found 3 BLE advertisers
Found a device advertising Service with UUID: ABCD
Found Service with UUID: ABCD
Found Characteristic with UUID: 1234
Characteristic is readable
Characteristic value: Hello BLE

Prototypical reference: https://github.com/h2zero/NimBLE-Arduino/blob/master/docs/New_user_guide.md#creating-a-client

Suggested reading: https://www.elektor.com/products/develop-your-own-bluetooth-low-energy-applications (no affiliation).


Simple BLE Server on ESP32

Exploration of Creating a Server: a simple Bluetooth BLE Server that advertises itself, along with a connectable service that has one read/write characteristic.

The example presented builds using Platformio with the espressif arduino-esp32 core, and leverages the NimBLE-Arduino Bluetooth library.

Project source code

; File: platformio.ini
; PlatformIO Project Configuration File
;
;   Build options: build flags, source filter
;   Upload options: custom upload port, speed and extra flags
;   Library options: dependencies, extra library storages
;   Advanced options: extra scripting
;
; Please visit documentation for the other options and examples
; https://docs.platformio.org/page/projectconf.html

[env:esp32dev]
platform = espressif32
board = esp32dev
framework = arduino

monitor_speed=115200

lib_deps = h2zero/NimBLE-Arduino@^1.4.0
// File: main.cpp
// Simple server that advertises itself and its connectable
// service with one read/write characteristic.

#include <Arduino.h>

#include "NimBLEDevice.h"

void setup()
{
    // Initialise the NimBLE library, providing a name for advertisement, or "".
    NimBLEDevice::init("NimBLE");
    
    // Create a Server:
    // Get a pointer to a newly created Server instance.
    NimBLEServer *pServer = NimBLEDevice::createServer();

    // Assign a Service to the Server:
    // Get a pointer to a newly created service instance, identified by
    // the uuid we give the service. It can be 16, 32, or 128 bits.
    NimBLEService *pService = pServer->createService("ABCD");

    // Add a Characteristic to the Service:
    // Get a pointer to a newly created Characteristic instance, identified by
    // a 16, 32, or 128 bit uuid that we give the Characteristic, and with
    // default properties of NIMBLE_PROPERTY::READ | NIMBLE_PROPERTY::WRITE
    NimBLECharacteristic *pCharacteristic = pService->createCharacteristic("1234");
    
    // Start the Service.
    pService->start();

    // Give the Characteristic a value:
    pCharacteristic->setValue("Hello BLE");

    // Create an an Advertisting(er) to solicit connections:
    // Get a pointer to a newly created Advertising(er) instance.
    NimBLEAdvertising *pAdvertising = NimBLEDevice::getAdvertising();

    // Inform the Advertising(er) of the uuid given our Service when created:
    pAdvertising->addServiceUUID("ABCD"); 

    // Begin advertising for connections:
    pAdvertising->start(); 
}

void loop()
{

}

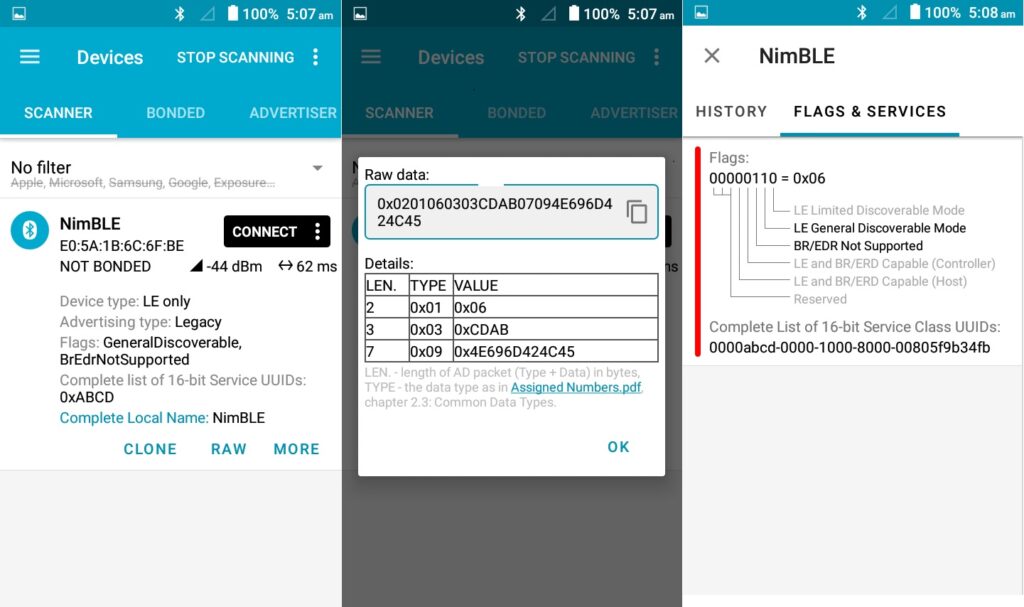
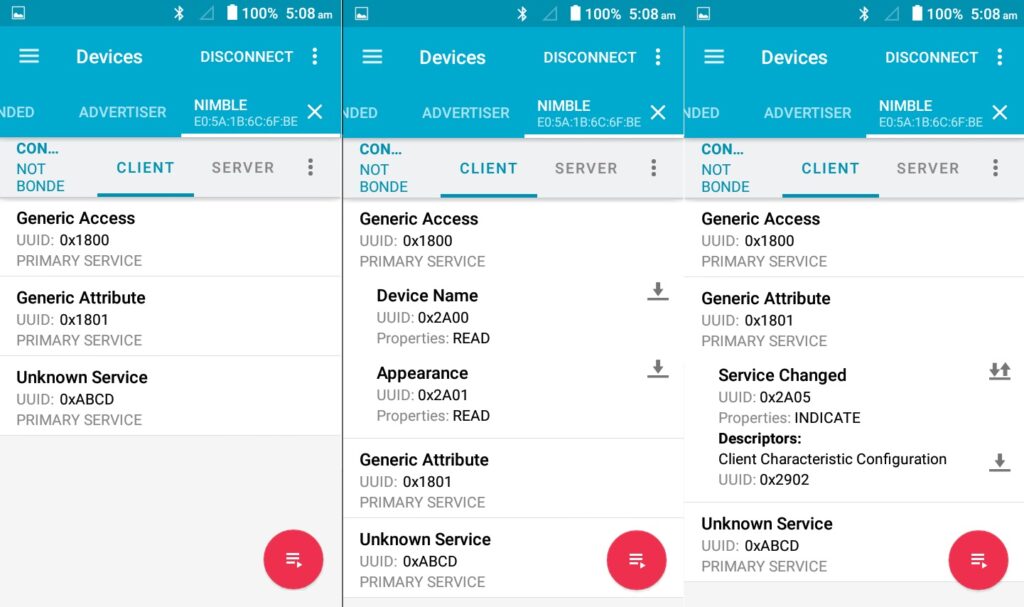
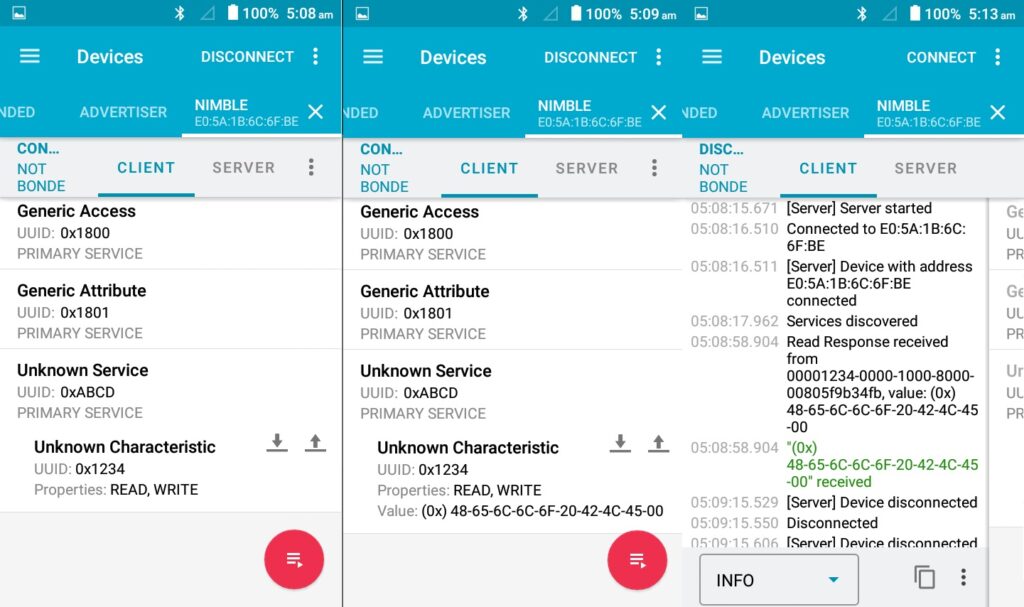
Nordic nRF Connect mobile app screenshots

Prototypical reference: https://github.com/h2zero/NimBLE-Arduino/blob/master/docs/New_user_guide.md#creating-a-server

Suggested reading: https://www.elektor.com/products/develop-your-own-bluetooth-low-energy-applications (no affiliation).