
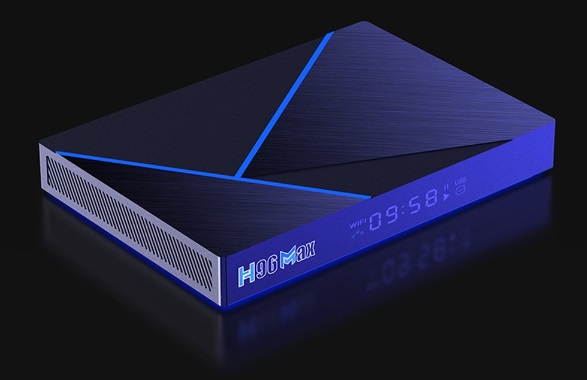
Learn how to build, flash, and initial-configure Armbian Ubuntu 24.04 for the Shenzhen Haochuangyi Technology Co., Ltd. H96 MAX V56 RK3566 4GB/32GB or 8GB/64GB TV Box.
By the end of the process, you’ll have a dependable Ubuntu desktop environment with connectivity options including WiFi, 1Gb Ethernet, SSH, SFTP, RDP (with remote sound), and SMB. You’ll be able to stream HD-quality YouTube videos and back up your installation to USB storage. This backup will serve as a solid foundation for countless future application developments.
Prerequisites
- A PC installation of Ubuntu 22.04.x with ~12GB free disk space.
- H96 MAX V56 RK3566 TV Box with 4GB/32GB or 8GB/64GB memory.
- Monitor, USB keyboard, USB mouse.
- Optional: USB external storage with 64GB+ free space, plus a USB hub.
- USB 2.0 Male A-type to Male A-type cable.
- Precision soldering skills, some Linux shell command skills.
Motivation
During the 2020-2023 global Broadcom chip shortage, unable to find suitable hardware and not wanting to be burdened with yet another disappointing version of the now extortionate Raspberry Pi, I sought an alternative. This came in the form of an H96 MAX V56 RK3566 8GB/64GB TV Box. I knew that setting up Linux on such a device would be a challenge, but thanks to the efforts of the dedicated Armbian and Armbian Community developers, the process turned out to be quite straightforward. The results were outstanding, and I am sharing the path to achieving this outcome here.
Building Armbian
The official Armbian build system is designed to cross-compile for arm64 on an x86-64 machine running Ubuntu 22.04.x LTS (Jammy Jellyfish). This guide is specific to a bare-metal environment, as opposed to a hosted one, for Ubuntu 22.04.x. For details on how to build under alternative operating systems (Windows, Mac, other Linux distributions) using VirtualBox or Docker images of Ubuntu 22.04.x, see here.
On your x86-64 PC running Ubuntu 22.04.x, initially with at least 5GB of free storage space, execute the following commands to download the Armbian build system, and then build the Armbian Ubuntu 24.04 installation image:
sudo apt update

apt-get -y -qq install git

mkdir ~/armbian

cd armbian

git clone --depth=1 --branch=main https://github.com/armbian/build

cd build

export DISTRIBUTION_STATUS=unsupported    # Required before any subsequent compilation.

export FORCE_CHECK_MD5_PACKAGES=no        # Required before any subsequent compilation.

./compile.sh build BOARD=h96-tvbox-3566 BRANCH=current BUILD_DESKTOP=yes BUILD_MINIMAL=no DESKTOP_APPGROUPS_SELECTED='browsers desktop_tools internet multimedia programming' DESKTOP_ENVIRONMENT=gnome DESKTOP_ENVIRONMENT_CONFIG_NAME=config_base KERNEL_CONFIGURE=no RELEASE=noble KERNEL_BTF=no
After significant downloading and compilation, you will then have an installation image: ~/armbian/build/output/images/Armbian-unofficial_X.X.X-trunk_H96-tvbox-3566_noble_current_x.x.x_gnome_desktop.img
Well, that was easy? By no means! This achievement represents countless hours of coding by a small, dedicated team of computing enthusiasts and professionals from the Armbian Community, Armbian Developers, and, extending further, to literally thousands of mainstream Linux developers. The fact that the majority of this work has been performed on a volunteer, unpaid basis is worth keeping in mind, especially when seeking their help online.
Getting it running
The Armbian image resulting from the build process is a just-large-enough disk image that expands to the size of the media on first boot. It can be written to a microSD card and run from there, with the option to install it to eMMC memory from the running microSD image. Alternatively, the same installation image can be flashed directly to the H96’s 32GB or 64GB eMMC internal memory. Each of these methods requires some level of hardware manipulation.
MicroSD card run/ install method
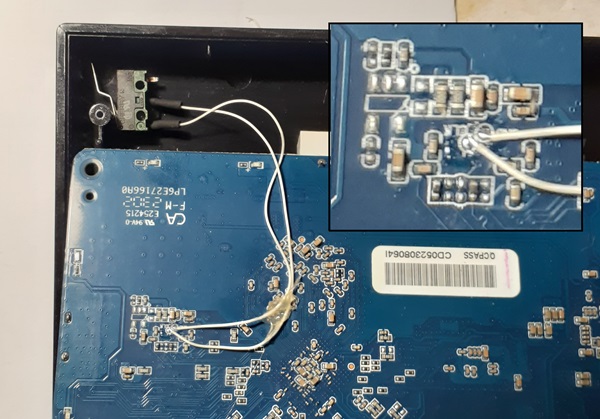
Shenzhen Haochuangyi Technology Co., Ltd. included the option for an unpopulated microSD card socket on the PCB of the H96 MAX V56 TV Box. To run Armbian from a microSD card or to install it to the eMMC from there, you only need to populate the PCB with a suitable microSD card socket.

Liquid rosin flux and a soldering iron with a very fine pointed tip will be helpful here, and you might also want some fine solder wicking braid in case you need to resolve any solder bridges. Be careful when making (melting) an initial access hole in your TV Box’s case to avoid causing undue damage.
Next, write your Armbian image to a recommended SanDisk Ultra A1 microSD card using balenaEtcher. I had no difficulty using a genuine SanDisk Extreme Pro A2 64GB microSD card, although microSD card selection can sometimes be an issue. Finally, insert the card, plug in a DHCP-enabled Ethernet connection to the Web, switch on the device, and within two minutes, you should see the Armbian pre-configuration screen on your display. Enter the requested details, and you should then have an installation that can be run at any time from your microSD card.
To install the Armbian image to your TV Box’s internal eMMC memory from a running microSD card image, run the Armbian configuration utility from the desktop and select ‘System and Security Settings > Install/update bootloader > Boot from eMMC – System on eMMC’. Shut down the device, remove the microSD card, power cycle the box, and it should then boot from the internal memory.
Later in this article, we will examine a method for backing up the contents of an eMMC installation, which can later be restored. While the method described above for installing a built Armbian image to eMMC from a microSD card is the easiest, it cannot be used to restore backups of eMMC images. For that, we must use the same methods that we will use to install the initial Armbian image to internal eMMC memory, as follows…
Flash direct to eMMC method
Beneath the H96’s eMMC chip, on the opposite side of the PCB, are two exposed pads marked CLK and GND. Shorting these two pads together during boot tricks the RK3566 SoC into thinking it has no viable eMMC memory connected, causing it to boot into MASK ROM mode. In this mode, we can upload the built Armbian image, as well as any backup copies of our eMMC, back to the internal memory using a USB 2.0 type-A male to type-A male cable.
Hacking RockChip TV Boxes involves a great deal of eMMC CLK to GND shorting. To avoid repeatedly opening the box and potentially wearing out the PCB pads, we will solder an externally accessible microswitch to the CLK and GND pads. The only caveat to this process is to use thin and short lengths of wire to minimally distort the CLK signal.
The software we will use to flash our images directly to the internal eMMC memory is RockChip’s rkdeveloptool, which can be built and installed as follows:
sudo apt update

sudo apt-get install libudev-dev libusb-1.0-0-dev dh-autoreconf

cd ~/armbian

git clone https://github.com/rockchip-linux/rkdeveloptool.git

cd rkdeveloptool

aclocal

autoreconf -i

autoheader

automake --add-missing

./configure

make

sudo cp rkdeveloptool /usr/local/sbin/

rkdeveloptool -h
To accomplish the MASK ROM mode upload to eMMC memory, there are two different loader binaries: one for the 4GB/32GB variant and another for the 8GB/64GB variant of the H96 Max V56 box. They can be downloaded from here for the 4GB/32GB version, and from here for the 8GB/64GB device.
To prepare your TV Box for flashing, hold the CLK-GND shorting switch closed, apply power using a USB 2.0 type-A male to type-A male cable, and release the switch after 3 seconds. Once your device is in MASK ROM mode, upload the appropriate loader binary to your RK3566 SoC’s RAM, and then flash the built Armbian or backup image to the internal eMMC memory as follows:
lsusb   # Check your device is recognised and ready.

sudo rkdeveloptool db </pathto/loader.bin>

sudo rkdeveloptool wl 0 </pathto/image.img>

sudo rkdeveloptool rd
A built Armbian installation image that is just large enough will upload relatively quickly, while a 64GB backup will take much longer. Flashing the eMMC may require several attempts before completing successfully. Adding a supplementary power source, in addition to the connection via the USB cable, may improve your success rate.
Finally, remove the USB cable, plug in a DHCP-enabled Ethernet connection, switch on the device, and within a short time, you should see the Armbian pre-configuration screen on your display. Enter the requested details, and you should then have an installation that can be run at any time from your internal eMMC memory.
Can’t get your box into MASK ROM mode after previously installing Armbian Ubuntu 24.04? Please see the following note.
Initial Ubuntu configuration
Much of what has been mentioned (and much of what follows) is not unique and can be found in various sources. In the following, I make a modest contribution by taking a somewhat idiosyncratic installation with great potential to a point where that potential can later be fully realised. We will tweak a few configurations, install some programs and scripts, and back up our work as a robust starting point for subsequent customisation.
Let’s start by upgrading the already installed software and then providing a simple text editor to assist with our configuration process:
sudo apt update

sudo apt upgrade

sudo apt-get install gedit
Retyping the sudo password can get tedious, so we will eliminate the need to do so by appending a line to the /etc/sudoers file using visudo:
sudo visudo

# Append this line:

<your_username> ALL=(ALL) NOPASSWD: ALL

# Save with ctrl-o enter, and exit with ctrl-x.
To prevent the Armbian Ubuntu installation from automatically suspending or powering down after brief inactivity—whether logged in locally, remotely, or logged out—we need to access the gdm user and adjust a few settings:
gsettings set org.gnome.settings-daemon.plugins.power sleep-inactive-ac-type nothing

gsettings set org.gnome.settings-daemon.plugins.power sleep-inactive-battery-type nothing
sudo nano /etc/passwd
# Search for and comment this entry as shown...
#gdm:x:112:118:Gnome Display Manager:/var/lib/gdm3:/bin/false
...and add this substitute entry directly beneath.
gdm:x:112:118:Gnome Display Manager:/var/lib/gdm3:/bin/bash
# Save with ctrl-o enter, and exit with ctrl-x.sudo nano /etc/sudoers
# Append this line:
gdm ALL=(ALL:ALL) ALL
# Save with ctrl-o enter, and exit with ctrl-x.sudo passwd gdm
# Enter a memorable, secure password.su -s /bin/bash gdm
# Enter gdm user password.
sudo gsettings set org.gnome.settings-daemon.plugins.power sleep-inactive-ac-type nothing
sudo gsettings set org.gnome.settings-daemon.plugins.power sleep-inactive-battery-type nothing
exitsudo nano /etc/passwd
# Revert the changes previously made.
gdm:x:112:118:Gnome Display Manager:/var/lib/gdm3:/bin/false
#gdm:x:112:118:Gnome Display Manager:/var/lib/gdm3:/bin/bash
# Save with ctrl-o enter, and exit with ctrl-x.sudo nano /etc/sudoers
# Revert the changes previously made.
#gdm ALL=(ALL:ALL) ALL
# Save with ctrl-o enter, and exit with ctrl-x.sudo systemctl mask sleep.target suspend.target hibernate.target hybrid-sleep.target
sudo reboot nowYou now have an Armbian Ubuntu installation that will no longer suspend or shut down inadvertently.
We will now install xrdp so we can log in to the TV Box desktop over a network using the RDP protocol. To ensure this works, we need to disable automatic logins for the user via Ubuntu configuration ‘System > Users’ settings tab. Without this step, xrdp will not function correctly, as only one login session—whether local or remote—is permitted at a time. You must be logged out locally to connect remotely.
First, download the xrdp installation script, comment out some entries, and substitute others. Then, proceed with the lengthy download and compilation process.
sudo apt update

cd ~/Downloads/

wget https://www.c-nergy.be/downloads/xRDP/xrdp-installer-1.5.1.zip

unzip xrdp-installer-1.5.1.zip

chmod +x  ~/Downloads/xrdp-installer-1.5.1.sh

# Some quick line substitutions.

sed -i '/version=/s/^/# /' xrdp-installer-1.5.1.sh
sed -i '/codename=/s/^/# /' xrdp-installer-1.5.1.sh
sed -i '/Release=/s/^/# /' xrdp-installer-1.5.1.sh

sed -i '/version=/a version="Ubuntu 24.04"' xrdp-installer-1.5.1.sh
sed -i '/codename=/a codename="noble"' xrdp-installer-1.5.1.sh
sed -i '/Release=/a Release="24.04"' xrdp-installer-1.5.1.sh

sed -i '/DESKTOP_SESSION=/s/^/# /' xrdp-installer-1.5.1.sh
sed -i '/DESKTOP_SESSION=/a DESKTOP_SESSION="ubuntu"' xrdp-installer-1.5.1.sh


sudo nano /etc/apt/sources.list

# Uncomment all deb-src entries.

# Save with ctrl-o enter, and exit with ctrl-x.


./xrdp-installer-1.5.1.sh -s    # Enter 'y' when requested.

# Make cup of tea, drink it while waiting.

sudo rm -r ~/Download/*
sudo apt update
sudo apt install xorgxrdpnano ~/.xsession
# Paste in the following:
#!/usr/bin/sh
# Mandatorily source xinitrc-common, which is common code shared between the
# Xsession and xinitrc scripts which has been factored out to avoid duplication
. /etc/X11/xinit/xinitrc-common
# Save with ctrl-o enter, and exit with ctrl-x.
exec dbus-run-session -- startlxqtsudo nano /etc/xrdp/sesman.ini
# Search for and comment this entry as shown...
#KillDisconnected=false
# ...and add this substitute entry directly beneath.
KillDisconnected=true
# Save with ctrl-o enter, and exit with ctrl-x.sudo nano /etc/xrdp/xrdp.ini
# Search for the [Xorg] entry, and append to it's list of settings:
KillDisconnected=true
# Save with ctrl-o enter, and exit with ctrl-x.sudo systemctl restart xrdp
sudo systemctl restart xrdp-sesmanThis process will result in an xrdp installation with functioning remote sound.
The WiFi installation process is someone else’s work, repeated at this requisite point.
cd /lib/firmware/brcm/

sudo wget https://github.com/CoreELEC/brcmfmac_sdio-firmware-aml/raw/master/firmware/brcm/fw_bcm4335b0_ag.bin

sudo ln -s fw_bcm4335b0_ag.bin brcmfmac4335-sdio.h96-TVbox,rk3566.bin

sudo shutdown now
Conclude the WiFi configuration as shown below. If you have connected to your xrdp server from another machine, you can enter the text file contents into nano by copying and pasting. Otherwise, log in via SSH and paste the respective contents from the clipboard there.
nmcli dev wifi

sudo nano /lib/firmware/brcm/brcmfmac4335-sdio.txt

# -------- Copy and paste the following into nano: --------

# bcm94335wlcspMS_ES50_RC171p24p23_04052013_AM_mdfy_PAparam.txt -- 4/5/2013 by Murata, based on bcm94335wlcspMS_ES50_RC171p24p20_04022013_AM.txt, changed PA parameters and txidxcap parameters and ccode.
# bcm94335wlcspMS_ES50_RC171p24p20_04022013_AM.txt -- 4/2/2013 by Broadcom Corporation
# Use with AARDVARK_REL_6_30_171_24_23 -- Murata BCM4335 WLCSP 11AC Module
# Sample variables file for Murata Type-XJ ES5.0 (0x00 0x11) -- bcm94335wlcspMS_AM_P400.txt as original
sromrev=11
boardrev=0x1500
boardtype=0x064b
boardflags=0x10401001
boardflags2=0x0
#updated boardflags3 for forcing to enable external LPO
boardflags3=0x0800c08b
macaddr=00:90:4c:c5:12:38
#ccode modified by Murata
#ccode=0
ccode=XS
regrev=0
antswitch=0
pdgain5g=1
pdgain2g=1
tworangetssi2g=0
tworangetssi5g=0
femctrl=4
vendid=0x14e4
devid=0x43ae
manfid=0x2d0
#prodid=0x052e
nocrc=1
#otpimagesize=502
xtalfreq=37400
extpagain2g=1
extpagain5g=1
rxgains2gelnagaina0=2
rxgains2gtrisoa0=6
rxgains2gtrelnabypa0=1
rxgains5gelnagaina0=3
rxgains5gtrisoa0=5
rxgains5gtrelnabypa0=1
rxchain=1
txchain=1
aa2g=1
aa5g=1
ag0=0
ag1=0
tssipos5g=1
tssipos2g=1
#PA parameters (2G20M/2G40M/5G20M/5G40M/5G80M)
#PA parameters modified by Murata
#pa2ga0=-208,6208,-764
#pa2ga1=-203,6429,-793
#pa5ga0=-167,5736,-685,-157,5669,-670,-157,5548,-665,-141,5621,-664
#pa5ga1=-101,6543,-735,-99,6452,-731,-147,5743,-695,-75,6468,-723
#pa5ga2=-172,5903,-708,-160,5868,-698,-113,6264,-722,-125,5915,-684
pa2ga0=0xff31,0x1759,0xFD1D
pa2ga1=0xff35,0x18BB,0xFCEC
pa5ga0=0xff78,0x1715,0xFD49,0xff89,0x1714,0xFD57,0xff86,0x1652,0xFD62,0xffa9,0x1760,0xFD5E
pa5ga1=0xff56,0x1596,0xFD5F,0xff88,0x1764,0xFD45,0xff89,0x1632,0xFD65,0xff69,0x160E,0xFD49
pa5ga2=0xff5a,0x1667,0xFD4E,0xff5f,0x15F7,0xFD5E,0xff5a,0x1531,0xFD68,0xff6e,0x1587,0xFD6A
# Default Target Power for 2G -- 17dBm(11)/14dBm(54)/13dBm(MCS7,MCS8)/16dBm(6,MCS0)
maxp2ga0=74
cckbw202gpo=0
cckbw20ul2gpo=0
dot11agofdmhrbw202gpo=0x6666
ofdmlrbw202gpo=0x0022
mcsbw202gpo=0x88866662
# Default Target Power for 5G -- 14dBm(54)/13dBm(HT20-MCS7,VHT20-MCS8)/12dBm(HT40-MCS7,VHT40-MCS9)/11dBm(VHT80-MCS8/MCS9)/16dBm(6,20HT-MCS0)
maxp5ga0=74,74,74,74
# Low
mcslr5glpo=0
mcsbw205glpo=0x88866662
mcsbw405glpo=0xAAA88884
mcsbw805glpo=0xCCCAAAA6
# Mid
mcslr5gmpo=0
mcsbw205gmpo=0x88866662
mcsbw405gmpo=0xAAA88884
mcsbw805gmpo=0xCCCAAAA6
# High
mcslr5ghpo=0
mcsbw205ghpo=0x88866662
mcsbw405ghpo=0xAAA88884
mcsbw805ghpo=0xCCCAAAA6
#20MHz High Rate
sb20in40hrpo=0x0
sb20in80and160hr5glpo=0x0
sb20in80and160hr5gmpo=0x0
sb20in80and160hr5ghpo=0x0
#40MHz High Rate
sb40and80hr5glpo=0x0
sb40and80hr5gmpo=0x0
sb40and80hr5ghpo=0x0
#20MHz Low Rate
sb20in40lrpo=0x0
sb20in80and160lr5glpo=0x0
sb20in80and160lr5gmpo=0x0
sb20in80and160lr5ghpo=0x0
#40MHz Low Rate
sb40and80lr5glpo=0x0
sb40and80lr5gmpo=0x0
sb40and80lr5ghpo=0x0
dot11agduphrpo=0x0
dot11agduplrpo=0x0
tssifloor2g=80
tssifloor5g=160,190,240,260
#rpcal:use with 171.17 or later, compensates filter ripple
rpcal2g=0x0
rpcal5gb0=0x0
#cckdigfilttype[0-7] 0:default
cckdigfilttype=2
phycal_tempdelta=25
#GPIO 0 for SDIO HW OOB interruption
muxenab=0x10
#sd_gpout=0
#sd_oobonly=1
rssicorrnorm_c0=-3,-2
rssicorrnorm5g_c0=-1,0,-3,-1,0,-3,-3,-2,-4,-3,-2,-4
#txidxcap2g and txidxcap5g modified by Murata
#txidxcap2g=32
#txidxcap5g=44
txidxcap2g=36
txidxcap5g=36
paparambwver=1


# -------- Save with ctrl-o enter, and exit with ctrl-x. --------

sudo rmmod brcmfmac_wcc brcmfmac brcmutil    # ignore any errors

sudo modprobe brcmfmac

sudo reboot now
If you run Samba on your intranet or wish to connect Ubuntu’s Files file manager to Samba over the web, we will prepare for that here:
sudo apt-get update

sudo apt-get install gvfs-backends

# Connect with "smb://username@ip_address_or_domain_name/share_name"
Install Chromium Browser for HD YouTube playback!
snap install chromiumTo ensure that all this work is preserved and not wasted, you can back up the eMMC image to an external USB storage device with at least 64GB of free capacity. To facilitate this, we will add some scripts: one for uncompressed image backups and another for saving compressed backup images. If you are connected to your xrdp server from another machine, you can paste the script contents into nano directory. Otherwise, log in via SSH and paste the respective contents from there.
mkdir ~/bin

cd ~/bin

nano save_image.sh

# -------- Copy and paste the following into nano: --------

#!/bin/bash

# Copyright © 2024, Murray R. Van Luyn.

printf "\nCopying full eMMC image to backup file.\n\n"

# List sub-directories in /media/$USER and store them
sub_dirs=$(ls -d "/media/$USER"/*/)

# Extract the first sub-directory name
first_sub_dir=$(basename "$(echo "$sub_dirs" | head -n 1)")

# Ensure first_sub_dir is not empty
if [ -z "$first_sub_dir" ]; then
  echo "No sub-directories found in /media/$USER";
  printf "\nPress Enter to exit...";
  echo -e '\a'; # Alert sound
  read -r;
  exit 1
fi

# Define the backup file path
backup_file="/media/$USER/$first_sub_dir/backup.$(date +%d-%m-%Y).img"

# Get the backup directory path
backup_dir="/media/$USER/$first_sub_dir"

# Calculate the size required for the backup
required_space_mb=61908

# Check available disk space
available_space_mb=$(df --output=avail -m "$backup_dir" | tail -n1)

if [ "$available_space_mb" -lt "$required_space_mb" ]; then
  echo "Not enough disk space in $backup_dir. Required: $required_space_mb MB, Available: $available_space_mb MB.";
  printf "\nPress Enter to exit...";
  echo -e '\a'; # Alert sound
  read -r;
  exit 1
fi

# Perform the backup operation
if ! dd if=/dev/mmcblk1 of=$backup_file bs=1048576 count=59040 status=progress; then
  echo "Backup operation failed.";
  printf "\nPress Enter to exit...";
  echo -e '\a'; # Alert sound
  read -r;
  exit 1
fi

echo "Backup operation completed successfully."
printf "\nPress Enter to exit..."
echo -e '\a' # Alert sound
read -r;


# -------- Save with ctrl-o enter, and exit with ctrl-x. --------

chmod 764 save_image.sh

# To copy an uncompressed eMMC image to USB storage:

./save_image.sh
cd ~/bin
nano save_compressed_image.sh
# -------- Copy and paste the following into nano: --------
#!/bin/bash
# Copyright © 2024, Murray R. Van Luyn.
printf "\nCopying full eMMC image to compressed backup file.\n\n"
# List sub-directories in /media/$USER and store them
sub_dirs=$(ls -d "/media/$USER"/*/)
# Extract the first sub-directory name
first_sub_dir=$(basename "$(echo "$sub_dirs" | head -n 1)")
# Ensure first_sub_dir is not empty
if [ -z "$first_sub_dir" ]; then
echo "No sub-directories found in /media/$USER";
printf "\nPress Enter to exit...";
echo -e '\a'; # Alert sound
read -r;
exit 1
fi
# Define the backup file path
backup_file="/media/$USER/$first_sub_dir/backup.$(date +%d-%m-%Y).img.xz"
# Get the backup directory path
backup_dir="/media/$USER/$first_sub_dir"
# Calculate the size required for the backup
required_space_mb=61908
# Check available disk space
available_space_mb=$(df --output=avail -m "$backup_dir" | tail -n1)
if [ "$available_space_mb" -lt "$required_space_mb" ]; then
echo "Not enough disk space in $backup_dir. Required: $required_space_mb MB, Available: $available_space_mb MB.";
printf "\nPress Enter to exit...";
echo -e '\a'; # Alert sound
read -r;
exit 1
fi
# Perform the backup operation
backup_file="/media/$USER/$first_sub_dir/backup.$(date +%d-%m-%Y).img.xz"
if ! dd if=/dev/mmcblk1 conv=sync,noerror bs=1048576 count=59040 status=progress | xz -c --threads=0 > "$backup_file"; then
echo "Backup operation failed.";
printf "\nPress Enter to exit...";
echo -e '\a'; # Alert sound
read -r;
exit 1
fi
echo "Backup operation completed successfully."
printf "\nPress Enter to exit..."
echo -e '\a' # Alert sound
read -r;
# -------- Save with ctrl-o enter, and exit with ctrl-x. --------
chmod 764 save_compressed_image.sh
# To copy a compressed eMMC image to external USB storage:
./save_compressed_image.shFor those paying close attention, you’ll have noticed that these scripts are set up for the 8GB/64GB H96 Max V56 variant. To adapt them for the 4GB/32GB model, adjust the parameters to required_space_mb=30954 and count=29520.
Restoring the backup images to eMMC memory is straightforward. Simply flash the uncompressed image back to the internal memory using the same MASK ROM installation procedure detailed earlier. Alternatively, the uncompressed backup image can be written to a microSD card and run from there, though it cannot be subsequently installed to the eMMC memory from there. It is recommended that you test each backup image on a microSD card after creation, and before the backup is archived for later use.
Note:
As of August 2024, there is an issue with the upstream bootloader code that prevents the RK3566 SoC from connecting via USB when booted into MASK ROM mode. A workaround for this problem is to erase the bootloader sectors on the eMMC. This will render the system unable to boot normally, but it allows MASK ROM mode to connect and re-flash the internal eMMC memory as expected.
# WARNING - this will overwrite the bootloader code on your eMMC, rendering the system unbootable.

sudo dd if=/dev/zero of=/dev/mmcblk1 bs=512 count=32  # Zero early user space.

sudo sh -c 'echo 0 > /sys/block/mmcblk1boot0/force_ro' # Unlock boot partitions.
sudo sh -c 'echo 0 > /sys/block/mmcblk1boot1/force_ro'

sudo dd if=/dev/zero of=/dev/mmcblk1boot0 bs=1M count=4  #...and zero both of them.
sudo dd if=/dev/zero of=/dev/mmcblk1boot1 bs=1M count=4
If you have completely trashed your system and cannot boot from the eMMC to perform the overwrite, you can boot from a microSD card installation and execute the overwrite from there.
In conclusion
Well, there you have it. You can now build an Armbian Ubuntu 24.04 installation image and install it to either a microSD card or the eMMC of your H96 Max V56. You’ve learned how to eliminate suspend events, install xrdp with sound for remote desktop sessions, and set up WiFi and SMB for networked drives. You can enjoy HD YouTube videos with the Chromium browser, and all your work can be backed up and preserved as a starting point for various applications.
Honestly, I’m a newcomer and don’t know the first thing about Armbian or the H96 Max V56 RK3566 TV Box. You can reach out to those who are more knowledgeable, via the respective Armbian forum threads:
https://forum.armbian.com/topic/24091-efforts-to-develop-firmware-for-h96-max-v56-rk3566-4g32g
https://forum.armbian.com/topic/28895-efforts-to-develop-firmware-for-h96-max-v56-rk3566-8g64g
If you have newer 2025+ hardware in your H96 Max V56, on it’s own, this prolly won’t do you much good. See the Armbian website threads for upgrade details.